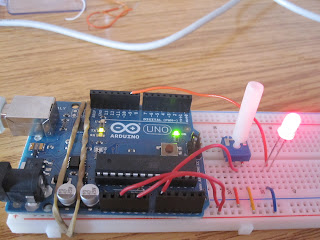
Siguiendo con nuestros proyectos para principiantes, a continuación veremos dos que nos permitirán controlar la intensidad de un LED (y ver los datos resultantes también en el Serial Monitor). Empecemos...
Control de intensidad de un LED con un potenciómetro
En este sencillo proyecto controlaremos la intensidad de un diodo LED mediante un potenciómetro que usaremos como manivela. Necesitaremos:
- 1 LED.
- 1 potenciómetro.
Conectaremos una de las patillas del potenciómetro que van juntas (hay dos en un lado y una sola en el otro) a tierra (negativo), y la otra a 5V (positivo). La patilla que va sola en su lado, la conectaremos al pin analógico (A0) de Arduino.
Por otra parte, conectaremos el negativo del LED a tierra, y el positivo al pin digital 9 de Arduino.
El resultado, con la ayuda de nuestra protoboard, es el siguiente:
El código que hará que podamos controlar la intensidad con el potenciómetro se expone a continuación:
int knobValue, fadeValue;
void setup() {
// initialize the serial port
Serial.begin(9600);
}
void loop() {
// read the value from the input
knobValue = analogRead(knobPin);
// remap the values from 10 bit input to 8 bit output
fadeValue = map(knobValue, 0, 1023, 0 , 254);
// use the input value to fade the led
analogWrite(ledPin, fadeValue);
// print the input value to the serial port for debugging
Serial.println(fadeValue);
}
Como veis es muy simple. El resultado se puede ver en este vídeo:
Control de intensidad de un LED con un botón
Ahora vamos a controlar la intensidad del LED mediante un botón. Cuando se pulsa el botón, la intensidad del LED va aumentando, y cuando se suelta, va disminuyendo.
Necesitaremos:
- 1 LED.
- 1 botón.
- 1 resistencia de 10k Ohms.
Conectaremos los componentes del siguiente modo:
Como se puede ver, usamos el pin digital 8 con el botón, y el 9 con el LED.
El código que hemos empleado es el siguiente:
const int fadeTimerFreq = 30;
// fadeTime is the total time it will take to complete the ease (in milliseconds)
const int fadeTime = 3000;
// <<
// additional variable for the timer
int currentTime, fadeTimerLast;
// these constant variables store the pin numbers
const int ledPin = 9;
const int buttonPin = 8;
const int fadeRange = 254;
// the amount to step the fade; must be between 1 and the fadeRange
const float fadeStep = (float(fadeTimerFreq) / (fadeTime)) * fadeRange;
int buttonValue, fadeTarget, fadeValueTweened;
float fadeValue;
void setup() {
// initialize the serial port; needed for debugging below
Serial.begin(9600);
// initialize the LED pin
pinMode(ledPin, OUTPUT);
// initialize the input pin
pinMode(buttonPin, INPUT);
}
void loop() {
// for all timers
currentTime = millis();
// checks to see if the number of milliseconds has passed
if ( abs(currentTime - fadeTimerLast) >= fadeTimerFreq) {
fadeTimerLast = currentTime;
// read the value from the input
buttonValue = digitalRead(buttonPin);
// step the fading
if(buttonValue == 1){
// if the button is pressed, increase the fade
fadeValue = fadeValue + fadeStep;
}
else{
// if the button is not pressed, decrease the fade
fadeValue = fadeValue - fadeStep;
}
// constrain the fadeValue so it can't go off toward infinity
fadeValue = constrain(fadeValue, 0, fadeRange);
// get the tweened value -- i.e. the smooth value
fadeValueTweened = Quad_easeInOut(fadeValue, 0, fadeRange);
// use the tweened value to set the brightness of the LED
analogWrite(ledPin, fadeValueTweened);
// print the values to the serial port for debugging
Serial.print(buttonValue);
Serial.print(", ");
Serial.println(fadeValue);
}
}
// Quad easing thanks to Robert Penner
// variables used are type "float" so that you can throw smaller numbers at it and it will //still work well
float Quad_easeInOut(float t, float fixedScaleStart, float fixedScaleEnd){
// float b = 0, c = 1, d = 1;
float b = fixedScaleStart;
float c = fixedScaleEnd - fixedScaleStart;
float d = fixedScaleEnd;
if ((t/=d/2) <>
return -c/2 * ((--t)*(t-2) - 1) + b;
}
El resultado se puede ver aquí:
Y... eso es todo :)
Un saludo.


No hay comentarios:
Publicar un comentario